CptS 481 - Python Software Construction
Unit 15: tkinter
from IPython.core.display import HTML, Image, display
HTML(open("../include/notes.css", "r").read())
# make sure the demos and applications directories exist
! [ -d demos ] || mkdir demos
! [ -d applications ] || mkdir applications

# Use this to enable/disable execution of the Tkinter examples.
# (If they are disabled, this notebook will recreate them without
# interaction.)
runTkinter = True
tkinter is a widely-available, widely-used GUI toolkit for Python. It's usually packaged with Python distributions and runs on all popular platforms. Other features:
wrapper for Tk, which is written in Tcl
other packages (e.g. Python Megawidgets, sometimes matplotlib) are built on top of
tkinter
Other GUI toolkits for Python include:
PyQt (and PySide)
part of the (huge) Qt development framework
wxPython
wrapper for wxWidgets
kivy
newest one, includes multi-touch
Pygame
wrapper for Simple Directmedia Layer (SDL) -- targeted at games
PyGTK
wrapper for GTK+, successor is GObject (and PyGObject)
"Hello, world!" in tkinter
%%file demos/d00_first.py
from tkinter import Tk, Label

tk = Tk()
w = Label(tk, text='Hello, world!', font=('TimesRoman', 12, 'bold'))
w.grid()
tk.mainloop()
if runTkinter:
    !python3 demos/d*_first.py # the wildcard * allows for renumbering
Okay, that's hard to see, so let's make it bigger:
%%file demos/d01_firstLarger.py
from tkinter import Tk, Label

tk = Tk()
label = Label(tk, text='Hello, world!', font=('Helvetica', 72, 'bold'))
label.grid()
tk.mainloop()
if runTkinter:
    !python3 demos/d*_firstLarger.py
First Interactive tkinter Program
But that's not very interactive. Let's add interaction and be a bit more Pythonic by creating an Application class that inherits from a tkinter class.
%%file demos/d02_quitButton.py
from tkinter import Frame, Button, Tk

class Application(Frame):

    def __init__(self, parent=None):
        # always be sure to do this with tkinter child classes...
        super().__init__(parent)
        quitButton = Button(self, text="Goodbye, World!",
                            command=self.quit,
                            font=('times', 24))
        quitButton.grid()

root = Tk()
app = Application(root) # Instantiate the application class
app.grid() # "grid" is a Tkinter geometry manager
root.title("Sample application")
root.mainloop() # Wait for events, until "quit()" method is called
print("done")
if runTkinter:
    !python3 demos/d*_quitButton.py
Note the object orientation. Frames are containers for other widgets and it's comon to inherit Frame. Frames can be placed within other Frames, so basically we're actually creating a new widget.
What's Possible With tkinter?
Here's a little demo with just 50 lines of Python and tkinter. Don't worry about the details for now. (This is from an out-of-print book by John Grayson, modfied by me.)
%%file demos/d03_grayson_calculator.py
from tkinter import *

operators = "+", "-", "*", "/", "//", "=", "%", "**", "(", ")"

class Calculator(Frame):

    def __init__(self):
        super().__init__()
        self.option_add('*Font', 'Verdana 16 bold')
        self.master.title('Simple Calculator')
        self.master.iconname("calculator")

        self.display = StringVar()
        entry = Entry(self, relief=SUNKEN, textvariable=self.display)
        entry.pack(side=TOP, expand=YES, fill=BOTH)

        for key in ("123", "456", "789", "-0."):
            keyFrame = Frame(self)
            keyFrame.pack(side=TOP, expand=YES, fill=BOTH)

            for char in key:
                # Note that this "def" works identically to a lambda
                # expression assigned to the name "updateDisplay".
                # Using a lambda expression just eliminates the name.
                #
                # Note the use of argument defaults to pass arguments
                # to a function that's going to be called without
                # arguments from within "button".
                def updateDisplay(w=self.display, c=char):
                    # Update the widget with `c` appended to its
                    # current contents.
                    return w.set(w.get() + c)
                btn = Button(keyFrame, text=char, command=updateDisplay)
                btn.pack(side=LEFT, expand=YES, fill=BOTH)

        operatorFrame = Frame(self)
        operatorFrame.pack(side=TOP, expand=YES, fill=BOTH)
        for operator in operators:
            # This "if" statement selects one of two definitions
            # (i.e. assignments) of the function (reference)
            # "onPress".
            if operator == '=':
                # Note that we don't need to define a function (or use
                # a lambda expression) when we have a method that
                # takes no arguments (except for `self`).
                onPress = self.evaluateDisplay
            else:
                def onPress(display=self.display, s = ' {} '.format(
                            operator)):
                    return display.set(display.get() + s)
            # It's often common practice to give use the name of a
            # keyword argument for the argument value. We could have
            # used "command" instead of "onPress". The resulting
            # argument syntax "command=command" is confusing at first,
            # but makes good sense upon reflection.
            btn = Button(operatorFrame, text=operator, command=onPress)
            btn.pack(side=LEFT, expand=YES, fill=BOTH)

        clearF = Frame(self)
        clearF.pack(side=BOTTOM, expand=YES, fill=BOTH)

        btn = Button(self, text='Clear', command=self.clearDisplay)
        btn.pack(side=LEFT, expand=YES, fill=BOTH)

    def clearDisplay(self):
        """
        clears out the display readout
        """
        self.display.set('')

    def evaluateDisplay(self):
        """
        evaluates the display readout, replacing it with a string
        representation of its evaluation
        """
        try:
            expression = self.display.get()
            self.display.set(str(eval(expression)))
        except:
            self.display.set("ERROR")


calculator = Calculator()
calculator.pack(expand=YES, fill=BOTH) # Pack geometry manager
calculator.mainloop()
if runTkinter:
    !python3 demos/d*_grayson_calculator.py
Here's an even more impressive demonstration of what's possible with tkinter. This example, from Grayson, makes use of the Pmw ("Python Megawidget") package, which we don't have time to discuss. Also, not all of the buttons work, but it would be easy to make them do so.
%%file applications/tt42_grayson.py
from tkinter   import *
import Pmw, string

class SLabel(Frame):
    """ SLabel defines a 2-sided label within a Frame. The
        left hand label has blue letters the right has white letters """
    def __init__(self, master, leftl, rightl):
        Frame.__init__(self, master, bg='gray40')
        self.pack(side=LEFT, expand=YES, fill=BOTH)
        Label(self, text=leftl, fg='steelblue1',
                     font=("arial", 6, "bold"), width=5, bg='gray40').pack(
                         side=LEFT, expand=YES, fill=BOTH)
        Label(self, text=rightl, fg='white',
                     font=("arial", 6, "bold"), width=1, bg='gray40').pack(
                         side=RIGHT, expand=YES, fill=BOTH)

class Key(Button):
    def __init__(self, master, font=('arial', 8, 'bold'),
                 fg='white',width=5, borderwidth=5, **kw):
        kw['font'] = font
        kw['fg'] = fg
        kw['width'] = width
        kw['borderwidth'] = borderwidth
        Button.__init__(*(self, master), **kw)
        self.pack(side=LEFT, expand=NO, fill=NONE)

class Calculator(Frame):
    def __init__(self, parent=None):
        Frame.__init__(self, bg='gray40')
        self.pack(expand=YES, fill=BOTH)
        self.master.title('Tkinter Toolkit TT-42')
        self.master.iconname('Tk-42')
        self.calc = Evaluator()        # This is our evaluator
        self.buildCalculator()         # Build the widgets
        # This is an incomplete dictionary - a good exercise!
        self.actionDict = {
                'second': self.doThis, 'mode':    self.doThis,
                'delete': self.doThis, 'alpha':   self.doThis,
                'stat':   self.doThis, 'math':    self.doThis,
                'matrix': self.doThis, 'program': self.doThis,
                'vars':   self.doThis, 'clear':   self.clearall,
                'sin':    self.doThis, 'cos':     self.doThis,
                'tan':    self.doThis, 'up':      self.doThis,
                'X1':     self.doThis, 'X2':      self.doThis,
                'log':    self.doThis, 'ln':      self.doThis,
                'store':  self.doThis, 'off':     self.turnoff,
                'neg':    self.doThis, 'enter':   self.doEnter,
                           }
        self.current = ""

    def doThis(self,action):
        print(('"%s" has not been implemented' % action))

    def turnoff(self, *args):
        self.quit()

    def clearall(self, *args):
        self.current = ""
        self.display.component('text').delete(1.0, END)

    def doEnter(self, *args):
        result = self.calc.runpython(self.current)
        if result:
            self.display.insert(END, '\n')
            self.display.insert(END, '%s\n' % result, 'ans')
        self.current = ""

    def doKeypress(self, event):
        key = event.char
        if not key in ['\b']:
            self.current = self.current + event.char
        if key == '\b':
            self.current = self.current[:-1]

    def keyAction(self, key):
        self.display.insert(END, key)
        self.current = self.current + key

    def evalAction(self, action):
        try:
            self.actionDict[action](action)
        except KeyError:
            pass

    def buildCalculator(self):
        FUN   = 1            # Designates a Function
        KEY   = 0            # Designates a Key
        KC1   = 'gray30'     # Dark Keys
        KC2   = 'gray50'     # Light Keys
        KC3   = 'steelblue1' # Light Blue Key
        KC4   = 'steelblue'  # Dark Blue Key
        keys = [
            [('2nd',  '',     '',  KC3, FUN, 'second'),  # Row 1
             ('Mode', 'Quit', '',  KC1, FUN, 'mode'),
             ('Del',  'Ins',  '',  KC1, FUN, 'delete'),
             ('Alpha','Lock', '',  KC2, FUN, 'alpha'),
             ('Stat', 'List', '',  KC1, FUN, 'stat')],
            [('Math', 'Test', 'A', KC1, FUN, 'math'),    # Row 2
             ('Mtrx', 'Angle','B', KC1, FUN, 'matrix'),
             ('Prgm', 'Draw', 'C', KC1, FUN, 'program'),
             ('Vars', 'YVars','',  KC1, FUN, 'vars'),
             ('Clr',  '',     '',  KC1, FUN, 'clear')],
            [('X-1',  'Abs',  'D', KC1, FUN, 'X1'),      # Row 3
             ('Sin',  'Sin-1','E', KC1, FUN, 'sin'),
             ('Cos',  'Cos-1','F', KC1, FUN, 'cos'),
             ('Tan',  'Tan-1','G', KC1, FUN, 'tan'),
             ('^',    'PI',   'H', KC1, FUN, 'up')],
            [('X2',   'Root', 'I', KC1, FUN, 'X2'),      # Row 4
             (',',    'EE',   'J', KC1, KEY, ','),
             ('(',    '{',    'K', KC1, KEY, '('),
             (')',    '}',    'L', KC1, KEY, ')'),
             ('/',    '',     'M', KC4, KEY, '/')],
            [('Log',  '10x',  'N', KC1, FUN, 'log'),     # Row 5
             ('7',    'Un-1', 'O', KC2, KEY, '7'),
             ('8',    'Vn-1', 'P', KC2, KEY, '8'),
             ('9',    'n',    'Q', KC2, KEY, '9'),
             ('X',    '[',    'R', KC4, KEY, '*')],
            [('Ln',   'ex',   'S', KC1, FUN, 'ln'),      # Row 6
             ('4',    'L4',   'T', KC2, KEY, '4'),
             ('5',    'L5',   'U', KC2, KEY, '5'),
             ('6',    'L6',   'V', KC2, KEY, '6'),
             ('-',    ']',    'W', KC4, KEY, '-')],
            [('STO',  'RCL',  'X', KC1, FUN, 'store'),   # Row 7
             ('1',    'L1',   'Y', KC2, KEY, '1'),
             ('2',    'L2',   'Z', KC2, KEY, '2'),
             ('3',    'L3',   '',  KC2, KEY, '3'),
             ('+',    'MEM',  '"', KC4, KEY, '+')],
            [('Off',  '',     '',  KC1, FUN, 'off'),     # Row 8
             ('0',    '',     '',  KC2, KEY, '0'),
             ('.',    ':',    '',  KC2, KEY, '.'),
             ('(-)',  'ANS',  '?', KC2, FUN, 'neg'),
             ('Enter','Entry','',  KC4, FUN, 'enter')]]

        self.display = Pmw.ScrolledText(self, hscrollmode='dynamic',
                      vscrollmode='dynamic', hull_relief='sunken',
                      hull_background='gray40', hull_borderwidth=10,
                      text_background='honeydew4', text_width=16,
                      text_foreground='black', text_height=6,
              text_padx=10, text_pady=10, text_relief='groove',
                      text_font=('arial', 12, 'bold'))
        self.display.pack(side=TOP, expand=YES, fill=BOTH)
        self.display.tag_config('ans', foreground='white')
        self.display.component('text').bind('<Key>', self.doKeypress)
        self.display.component('text').bind('<Return>', self.doEnter)

        for row in keys:
            rowa = Frame(self, bg='gray40')
            rowb = Frame(self, bg='gray40')
            for p1, p2, p3, color, ktype, func in row:
                if ktype == FUN:
                    a = lambda s=self, a=func: s.evalAction(a)
                else:
                    a = lambda s=self, k=func: s.keyAction(k)
                SLabel(rowa, p2, p3)
                Key(rowb, text=p1, bg=color, command=a)
            rowa.pack(side=TOP, expand=YES, fill=BOTH)
            rowb.pack(side=TOP, expand=YES, fill=BOTH)

class Evaluator:
    def __init__(self):
        self.myNameSpace = {}
        self.runpython("from math import *")

    def runpython(self, code):
        try:
            return repr(eval(code, self.myNameSpace, self.myNameSpace))
        except SyntaxError:
            try:
                exec(code, self.myNameSpace, self.myNameSpace)
            except:
                return 'Error'

Calculator().mainloop()
if runTkinter:
    !python3 applications/tt42_grayson.py
We'll study this in more detail at the end of the class.
Tkinter Widget Tour
Let's look at the Tkinter widgets. This isn't just an introduction to the widget, though: Take a look at how we use Python's built-in data structures, especially collections, to make compact yet readable code.
Here's a UML diagram of the Tkinter widgets:

Label Widgets
The name Label is a little misleading. Yes, Labels can hold text, even multiline, but they can also hold images. In general, they're for display, not interaction. Here's an example, again from Grayson.
%%file demos/d04_grayson_label.py
from tkinter import *

tk = Tk()
try:
    tk.option_readfile('lecture_options.txt')
except TclError:
    pass
tk.title('tkinter Label demo')

Label(tk, text="""
I mean, it's a little confusing for me when you say 'dog kennel' if \
you want a mattress.  Why not just say 'mattress'?
""",
      wraplength=300, justify=LEFT, background='yellow').pack(pady=10)

f1=Frame(tk)
Label(f1,
      text="It's not working, we need more!",
      relief=RAISED).pack(side=LEFT, padx=5)
Label(f1,
      text="I'm not coming out!",
      relief=SUNKEN).pack(side=LEFT, padx=5)
f1.pack()

f2=Frame(tk)
for bitmap, relief  in (
    ('xlogo64',     RAISED),
    ('mensetmanus', SOLID),
    ('terminal',    SUNKEN),
    ('escherknot',  FLAT),
    ('calculator',  GROOVE),
    ('letters',     RIDGE)):
    Label(f2,
          bitmap='@bitmaps/%s' % bitmap,
          relief=relief).pack(side=LEFT, padx=5)
f2.pack()

tk.mainloop()
if runTkinter:
    !python3 demos/d*_grayson_label.py
Adding tkinter widgets to a GUI is 2-step process. First, create the widget. Then say where it belongs in its parent widget with (for now) grid(row, column). (Grayson prefers to use pack(), which is an alternative.)
Message Widgets
Message widgets are like Label widgets, except that they're designed to wrap text into multiple lines.
%%file demos/d05_grayson_message.py
from tkinter import *

root = Tk()
root.title('tkinter Message demo')
try:
    root.option_readfile('lecture_options.txt')
except TclError:
    pass

Message(root,
        text="Exactly.  It's my belief that these sheep are laborin' "
        "under the misapprehension that they're birds.  Observe their "
        "be'avior. Take for a start the sheeps' tendency to 'op about "
        "the field on their 'ind legs.  Now witness their attmpts to "
        "fly from tree to tree.  Notice that they do not so much fly "
        "as...plummet.", bg='royalblue',
        fg='ivory', relief=GROOVE).grid(row=0, column=0)
root.mainloop()
if runTkinter:
    !python3 demos/d*_grayson_message.py
Aside: The Tkinter Configuration File
tkinter allows a wide amount of user customizability. Users can set styles in an "options" file. Here's one we use for lectures in large lecture halls that increases the font size.
%%file lecture_options.txt
*Font:			Times 24 bold
*Entry.Font:    Courier 24 bold
Button Widgets
Button widgets are designed to be pressed. You can also find when they're released. They can be created with lots of attributes controlling appearance.
%%file demos/d06_grayson_button.py
from tkinter import *

root = Tk()
root.title('tkinter Button demo')
try:
    root.option_readfile('lecture_options.txt')
except TclError:
    pass

Label(root, text="You shot him!").pack(pady=10)
Button(root, text="He's dead!", state=DISABLED).pack(side=LEFT)
Button(root, text="He's completely dead!", command=root.quit).pack(side=RIGHT)
root.mainloop()
if runTkinter:
    !python3 demos/d*_grayson_button.py
Tkinter even allows you to change the layout while the program is running.
%%file demos/d07_grayson_dynamicButtons.py
from tkinter import *

root = Tk()
root.title('tkinter Button demo: dynamic buttons')
try:
    root.option_readfile('lecture_options.txt')
except TclError:
    pass


f0 = Frame(root)
f0.grid(row=0, column=0)

f1 = Frame(root)
f1.grid(row=0, column=1)

buttons = []
column = 0 # within f0

def newButton():
    global column
    button = Button(f0, text="Button {}".format(column), command=newButton)
    button.grid(row=0, column=column)
    column += 1
    buttons.append(button)

newButton()
newButton()
Button(f1, text="Quit", command=root.quit).grid(row=0, column=0)
root.mainloop()
if runTkinter:
    !python3 demos/d*_grayson_dynamicButtons.py
Here's another Button demo from Grayson showing the effect of borderwidth and relief attributes. Note also the effect of padx and pady in the grid() call.
%%file demos/d08_grayson_button_borders.py
from tkinter import *

class GUI:
    def __init__(self):
        self.root = Tk()
        try:
            self.root.option_readfile('lecture_options.txt')
        except TclError:
            pass
        self.root.title('tkinter Button demo: button styles')

        for bdw in range(5):
            setattr(self, 'of%d' % bdw, Frame(self.root, borderwidth=0))
            Label(getattr(self, 'of%d' % bdw),
                  text='borderwidth = %d  ' % bdw).pack(side=LEFT)
            for relief in [RAISED, SUNKEN, FLAT, RIDGE, GROOVE, SOLID]:
                def callback(s=self, r=relief, b=bdw):
                    s.prt(r,b)
                Button(getattr(self, 'of%d' % bdw), text=relief,
                       borderwidth=bdw, relief=relief, width=10,
                       command=callback).pack(
                                  side=LEFT, padx=7-bdw, pady=7-bdw)
            getattr(self, 'of%d' % bdw).pack()

    def prt(self, relief, border):
        print('%s:%d' % (relief, border))

myGUI = GUI()
myGUI.root.mainloop()
if runTkinter:
    !python3 demos/d*_grayson_button_borders.py
Entry Widgets
Entry widgets are designed to let the user enter a single line of text.
%%file demos/d09_grayson_entry.py
from tkinter import *

root = Tk()
root.title('tkinter Entry demo')
try:
    root.option_readfile('lecture_options.txt')
except TclError:
    pass

label = Label(root, text="occupation:")
label.grid(row=0, column=0, padx=5, pady=10)
stringVar = StringVar()
entry = Entry(root, width=40, textvariable=stringVar)
stringVar.set("What did you want to be?")
entry.grid(row=0, column=1, padx=5, pady=10)

# Note: Once mainloop exits, you can still retrieve the value of
# the textvariable ...
print('before the mainloop call, these two calls are equivalent:')
print('stringVar.get():', stringVar.get())
print('    entry.get():', entry.get())

root.mainloop()

print()
print('after the mainloop call, this still works:')
print('stringVar.get():', stringVar.get())
print('but this ...')
print('    entry.get():')
try:
    print(entry.get())
except:
    print('... raises an exception')
if runTkinter:
    !python3 demos/d*_grayson_entry.py
Note the StringVar. This is a Tkinter textvariable. These are objects associated with the values of Tkinter widgets. There are three kinds of these: StringVar, IntVar, and FloatVar. The values are accessed via get() and set() methods.
Radiobutton Widgets
To fully understand what is meant by "radiobuttons", you need to know how car radios from the '50s used to work. (Obscure knowledge sometimes pays off!)

Radiobuttons work a lot like Buttons. The main differences are
The value of the
Radiobuttonis associated with atextvariable(anIntVaror aStringVar).Only one of all of the
Radiobuttons that share atextvariablecan be selected at one time.
Here's a short demo of Radiobuttons:
%%file demos/d10_grayson_radiobutton_stringVar.py
from tkinter import *

root = Tk()
root.title('tkinter Radiobutton demo: radiobuttons with StringVars')
try:
    if 0: root.option_readfile('lecture_options.txt')
except TclError:
    pass

entries = (
    'Passionfruit',
    'Loganberries',
    'Mangoes in syrup',
    'Oranges',
    'Apples',
    'Grapefruit')
stringVar = StringVar() # shared by all entries in the radiobutton
for row, text in enumerate(entries):
    radiobutton = Radiobutton(root,
                              text=text, value=text, variable=stringVar)
    if 0: # enable/disable this to see what the indicator does
        radiobutton['indicatoron'] = False
    if 0: # demonstrate setting widget attributes using dictionary syntax
        radiobutton['text'] = radiobutton['text'] + '?'
    radiobutton.grid(row=row, column=0, padx=5, pady=5, sticky=W)
stringVar.set('Apples') # initial setting
root.mainloop()
if runTkinter:
    !python3 demos/d*_grayson_radiobutton_stringVar.py
In this case, Radiobutton values are strings.
They can also be ints:
%%file demos/d11_grayson_radiobutton_intVar.py
from tkinter import *

root = Tk()
root.title('tkinter Radiobutton demo: radiobuttons with IntVars')
try:
    root.option_readfile('lecture_options.txt')
except TclError:
    pass

entries = (
    ('Passionfruit',     1),
    ('Loganberries',     2),
    ('Mangoes in syrup', 3),
    ('Oranges',          4),
    ('Apples',           5),
    ('Grapefruit',       6))
intVar = IntVar() # shared by all entries in the radiobutton
for row, (text, value) in enumerate(entries):
    radiobutton = Radiobutton(root,
                              text=text, value=value, variable=intVar)
    if 0: # enable/disable this to see what the indicator does
        radiobutton['indicatoron'] = False
    radiobutton.grid(row=row, column=0, padx=5, pady=5, sticky=W)
intVar.set(3) # initial setting
root.mainloop()
if runTkinter:
    !python3 demos/d*_grayson_radiobutton_intVar.py
Checkbutton Widgets
Checkbuttons are like Radiobuttons, except that each has its own textvariable and you can select 0 or more of them. Here's a demo:
%%file demos/d12_grayson_checkbutton.py
from tkinter import *

root = Tk()
root.title('tkinter Checkbutton demo')
try:
    root.option_readfile('lecture_options.txt')
except TclError:
    pass

varOfCastmember = {}
for castmember, row, col, status in (
        ('John Cleese',    0, 0, NORMAL),
        ('Eric Idle',      0, 1, NORMAL),
        ('Graham Chapman', 1, 0, DISABLED),
        ('Terry Jones',    1, 1, NORMAL),
        ('Michael Palin',  2, 0, NORMAL),
        ('Terry Gilliam',  2, 1, NORMAL)):
    castmemberVar = IntVar()
    varOfCastmember[castmember] = castmemberVar
    checkbutton = Checkbutton(root,
                              text=castmember, state=status, anchor=W,
                              variable=castmemberVar)
    checkbutton.grid(row=row, column=col, sticky=W)

root.mainloop()
for castmember in varOfCastmember:
    var = varOfCastmember[castmember]
    print("{:>20}: {}".format(castmember, var.get()))
if runTkinter:
    !python3 demos/d*_grayson_checkbutton.py
Menu Widgets
Menus should be pretty familiar. Here's a demo with several examples:
%%file demos/d13_grayson_menu.py
from tkinter import * # This is more convenient.


def new_file():
    print("Create new file")


def open_file():
    print("Open existing file")


def stub_action():
    print("Menu select")


def makeCascadeMenubutton():
    menubutton = Menubutton(menubarFrame, text='Cascading Menus', underline=0)
    menubutton.menu = Menu(menubutton)
    menubutton.menu.choices = Menu(menubutton.menu)

    # create and populate the "weirdOnes" submenu
    menubutton.menu.choices.weirdOnes = Menu(menubutton.menu.choices)
    menubutton.menu.choices.weirdOnes.add_command(label='Stockbroker')
    menubutton.menu.choices.weirdOnes.add_command(label='Quantity Surveyor')
    menubutton.menu.choices.weirdOnes.add_command(label='Church Warden')
    menubutton.menu.choices.weirdOnes.add_command(label='BRM')

    menubutton.menu.choices.add_command(label='Wooden Leg')
    menubutton.menu.choices.add_command(label='Hire Purchase')
    menubutton.menu.choices.add_command(label='Dead Crab')
    menubutton.menu.choices.add_command(label='Tree Surgeon')
    menubutton.menu.choices.add_command(label='Filing Cabinet')
    menubutton.menu.choices.add_command(label='Goldfish')
    # note the "add_cascade()" rather than the "add_command()"
    menubutton.menu.choices.add_cascade(label='Is it a...',
            menu=menubutton.menu.choices.weirdOnes)

    menubutton.menu.add_cascade(label='Scripts',
                                   menu=menubutton.menu.choices)
    menubutton['menu'] = menubutton.menu
    return menubutton


def makeCheckbuttonMenubutton():
    menubutton = Menubutton(menubarFrame, text='Checkbutton Menus', underline=0)
    menubutton.menu = Menu(menubutton)

    menubutton.menu.add_checkbutton(label='Doug')
    menubutton.menu.add_checkbutton(label='Dinsdale')
    menubutton.menu.add_checkbutton(label="Stig O'Tracy")
    menubutton.menu.add_checkbutton(label='Vince')
    menubutton.menu.add_checkbutton(label='Gloria Pules')
    menubutton.menu.invoke(menubutton.menu.index('Dinsdale'))

    menubutton['menu'] = menubutton.menu
    return menubutton


def makeCommandMenubutton():
    menubutton = Menubutton(menubarFrame, text='Button Commands', underline=0)
    menubutton.menu = Menu(menubutton)

    menubutton.menu.add_command(label="Undo")
    menubutton.menu.entryconfig(0, state=DISABLED)

    menubutton.menu.add_command(label='New...', underline=0, command=new_file)
    menubutton.menu.add_command(label='Open...', underline=0, command=open_file)
    menubutton.menu.add_command(label='Wild Font', underline=0,
            font=('Zapfino', 14), command=stub_action)
    menubutton.menu.add_command(bitmap="@bitmaps/RotateLeft")
    menubutton.menu.add('separator')
    menubutton.menu.add_command(label='Quit', underline=0,
            background='red', activebackground='green',
            command=menubutton.quit)

    menubutton['menu'] = menubutton.menu
    return menubutton


def makeRadiobuttonMenubutton():
    menubutton = Menubutton(menubarFrame, text='Radiobutton Menus', underline=0)
    menubutton.menu = Menu(menubutton)

    menubutton.menu.add_radiobutton(label='metonymy')
    menubutton.menu.add_radiobutton(label='zeugmatists')
    menubutton.menu.add_radiobutton(label='synechdotists')
    menubutton.menu.add_radiobutton(label='axiomists')
    menubutton.menu.add_radiobutton(label='anagogists')
    menubutton.menu.add_radiobutton(label='catachresis')
    menubutton.menu.add_radiobutton(label='periphrastic')
    menubutton.menu.add_radiobutton(label='litotes')
    menubutton.menu.add_radiobutton(label='circumlocutors')

    menubutton['menu'] = menubutton.menu
    return menubutton


def makeDisabledMenubutton():
    menubutton = Menubutton(menubarFrame, text='Disabled Menu', underline=0)
    menubutton["state"] = DISABLED
    return menubutton

root = Tk()
root.title('tkinter Menu demo')
try:
    root.option_readfile('lecture_options.txt')
except TclError:
    pass

menubarFrame = Frame(root, relief=RAISED, borderwidth=2)
menubarFrame.grid(row=0, column=0)

commandMenubutton = makeCommandMenubutton()
commandMenubutton.grid(row=0, column=0)
cascadeMenubutton = makeCascadeMenubutton()
cascadeMenubutton.grid(row=0, column=1)
checkbuttonMenubutton = makeCheckbuttonMenubutton()
checkbuttonMenubutton.grid(row=0, column=2)
radiobuttonMenubutton = makeRadiobuttonMenubutton()
radiobuttonMenubutton.grid(row=0, column=3)
disabledMenubutton = makeDisabledMenubutton()
disabledMenubutton.grid(row=0, column=4)

root.mainloop()
if runTkinter:
    !python3 demos/d*_grayson_menu.py
Text Widgets
Text widgets allow for multi-line text output and allow you to define and attach tags to the text as you insert it.
%%file demos/d14_grayson_text.py
from tkinter import *
from random import randint

root = Tk()
try:
    root.option_readfile('lecture_options.txt')
except TclError:
    pass
root.title('tkinter Text Demo')

tagNamesAndAttrs = (
    # ( description, {
    #     [ attributeKeyword: attributeValue, ]*
    # } ),
    ( "normal text (no special tag attributes)", {
    } ),
    ( "12-point bold italic Verdana", {
        'font': ('Verdana', 12, 'bold', 'italic')
    } ),
    ( "24-point bold Verdana", {
        'font': ('Verdana', 24, 'bold')
    } ),
    ( "16-point Tempus Sans ITC in red", {
        'foreground':  'red',
        'font':        ('Tempus Sans ITC', 16),
    } ),
    ( "14-point Courier in green", {
        'foreground':  'dark green',
        'font':        ('Courier', 14),
    } ),
    ( "18-point Arial in blue", {
        'foreground':  'blue',
        'font':        ('Arial', 18),
    } ),
    ( "grooved with a border width of 4", {
        'relief':      GROOVE,
        'borderwidth': 4,
    } ),
    ( "grooved with a border width of 8 and a dark red background",  {
        'relief':      GROOVE,
        'background':  '#cc0000',
        'borderwidth': 8,
    } ),
)
nTags = len(tagNamesAndAttrs)

text = Text(root, height=nTags) # height is in lines (for Text) of "normal" text, I think
for i, (description, attrOfKwd) in enumerate(tagNamesAndAttrs):
    tagName = "_tag" + str(i)
    text.tag_configure(tagName, **attrOfKwd)
    text.insert(END, description + '\n', tagName)

if 0: # demonstrating another possible text.insert "index" syntax
    text.insert("3.4", "This is on line 3, column 4")

text.grid(row=0, column=0)
root.mainloop()
if runTkinter:
    !python3 demos/d*_grayson_text.py
We chose a few fonts to demo above, but there are actually quite a few. This program creates a Text that contains all it can find. The output scrolls.
%%file demos/d15_listFonts.py
from math import ceil
from tkinter import *
from tkinter.font import families as fontFamilies
from tkinter import messagebox

tk = Tk()

# read all font families into an unique, sorted list
families = list(set(fontFamilies()))
families.sort()

# Find out the maximum number of rows required.
nColumns = 10
nFamilies = len(families)
maxRowCount = ceil(nFamilies / nColumns)

tk.title(f"all {nFamilies} available font families on this system")

# Empirically determined, this allows all fonts to fit into
# buttons on one window. (The window may not fit on all displays.)
fontSize = 8

sampleText = "".join(
    "Lorem ipsum dolor sit amet, consectetur adipiscing elit,"
    " sed do eiusmod tempor incididunt ut labore et dolore magna aliqua."
    " Ut enim ad minim veniam, quis nostrud exercitation ullamco laboris"
    " nisi ut aliquip ex ea commodo consequat. Duis aute irure dolor in"
    " reprehenderit in voluptate velit esse cillum dolore eu fugiat nulla"
    " pariatur."
    " Excepteur sint occaecat cupidatat non proident, sunt in culpa qui"
    " officia deserunt mollit anim id est laborum.")

def showMessagebox(family):
    dialogBox = Toplevel()
    dialogBox.title(f'font: {family!r}')
    message = Message(dialogBox, text=sampleText, font=(family, 12))
    message.grid(row=0, column=0)
    button = Button(dialogBox, text="OK", command=dialogBox.destroy)
    button.grid(row=1, column=0)

for (k, family) in enumerate(families):

    row = k % maxRowCount
    column = k // maxRowCount

    button = Button(tk, text=family, anchor='w', padx=1, pady=1,
                    font=('Times', fontSize),
                    command=lambda family=family: showMessagebox(family))
    button.grid(row=row, column=column, sticky='ew')

tk.mainloop()
if runTkinter:
    !python3 demos/d*_listFonts.py
Scrollbar Widgets
You can connect a Scrollbar to another widget. Here's one that controls a Text widget vertically.
%%file demos/d16_grayson_scrollbar.py
from tkinter import *

kantSong = """
Immanuel Kant was a real pissant
    who was very rarely stable,
Heidegger, Heidegger was a boozy beggar
    who could think you under the table,
David Hume could out-consume
    Schopenhauer and Hegel,
And Wittgenstein was a beery swine who was just as schloshed as Schlegel.

There's nothing Nietzsche couldn't teach ya 'bout the turning of the wrist,
Socrates himself was permanently pissed...

John Stuart Mill, of his own free will,
    with half a pint of shandy was particularly ill,
Plato, they say, could stick it away,
    half a crate of whiskey every day,
Aristotle, Aristotle was a beggar for the bottle,
Hobbes was fond of his dram,
And Rene Descartes was a drunken fart,
    "I drink therefore I am."

Yes, Socrates himself is particularly missed;
A lovely little thinker but a bugger when he's pissed.
"""[1:-1]

root = Tk()
root.title('tkinter Text demo: Text with a Scrollbar')
try:
    root.option_readfile('lecture_options.txt')
except TclError:
    pass

label = Label(text="Monty Python's Philosophers' Song")
label.grid(row=0, column=0)

maxWidth = max([len(str) for str in kantSong.split('\n')])
text = Text(root, height=10, width=maxWidth)
text.insert(END, kantSong)
text.grid(row=1, column=0)

# Link scrolling the scrollbar in y link to the text
scrollbar = Scrollbar(root, command=text.yview)
text.configure(yscrollcommand=scrollbar.set)
scrollbar.grid(row=1, column=1, sticky=N+S)

root.mainloop()
if runTkinter:
    !python3 demos/d*_grayson_scrollbar.py
Here's an alternative way to show the above font information that also uses a Scrollbar:
%%file demos/d17_grayson_showFonts.py
from tkinter import *

root = Tk()
root.option_readfile('lecture_options.txt')
root.title("Lots O' Fonts")
text = Text(root, height=26, width=75)

scroll = Scrollbar(root, command=text.yview)
text.configure(yscrollcommand=scroll.set)

from tkinter.font import families

fmlys = list(families())
fmlys.sort()

text.tag_configure('default', font=('Courier', 12, 'bold'))

for fmly in fmlys:
    text.tag_configure(fmly, font=(fmly, 12))

maxl = max([ len(fmly) for fmly in fmlys ])
for fmly in fmlys:
    text.insert(END, '%*s: ' % (maxl,fmly), 'default')
    text.insert(END, fmly + '\n', fmly)
text.grid(row=0, column=0)
scroll.grid(row=0, column=1, sticky=N+S)

root.mainloop()
if runTkinter:
    !python3 demos/d*_grayson_showFonts.py
Listbox Widgets
Listboxes display multiple text items, one per line, and allow you to choose one or more of them. If you have a lot of items, you can link a Scrollbar to them.
%%file demos/d18_grayson_listbox.py
from tkinter import *

def demoSelectMode(selectMode, description):
    tk = Tk()
    tk.title(f'tkinter Listbox demo: {selectMode!r} mode')
    try:
        tk.option_readfile('lecture_options.txt')
    except TclError:
        pass

    label = Label(tk, text=f'{selectMode!r}: {description}')
    label.grid(row=0, column=0)

    list_ = Listbox(tk, selectmode=selectMode)
    for item in range(10):
        list_.insert(END, item)
    list_.grid(row=1, column=0)

    tk.mainloop()

demoSelectMode(SINGLE,   f"a single choice")
demoSelectMode(BROWSE,   f"like {SINGLE!r}, but mouse-drag-selectable")
demoSelectMode(MULTIPLE, f"multiple items selectable at one time")
demoSelectMode(EXTENDED, f"usually {SINGLE!r}, but ranges possible")
if runTkinter:
    !python3 demos/d*_grayson_listbox.py
Scale Widgets
Scales (or "sliders") allow you to select an int or float value from a range. Click the left mouse button in the "trough" to give fine control.
%%file demos/d19_horizontalScale.py
from tkinter import *

def printValue(valueStr):
    # The '\r' and the 'end=""' allow us to overwrite previous lines
    # when run interactively in a terminal (emulator).
    print(f'\rscale value: {valueStr:>4s}', end="")

root = Tk()
root.title('tkinter Scale demo')
try:
    root.option_readfile('lecture_options.txt')
except TclError:
    pass

scale = Scale(root, orient=HORIZONTAL, length=400, from_=0, to=100,
              tickinterval=20, command=printValue)
scale.grid(row=0, column=0, sticky='NE')
scale.set(50)
root.mainloop()
if runTkinter:
    !python3 demos/d*_horizontalScale.py
def f(parg, **kwargs):
    print(parg, **kwargs)

f(42, end="hello")
lst = [3, 4, 5]
(a, *_) = lst
Here's a more elaborate use of a Scale that uses it to control a Canvas (we haven't talked about those yet) drawing.
%%file demos/d20_grayson_verticalScaleWithArrow.py
from tkinter import *

def setHeight(heightStr):
    height = int(heightStr) + 21
    y2 = height - 30 # base of arrow tip
    if y2 < 21:
        y2 = 21
    coords = [
        15, 20,
        35, 20,
        35, y2,
        45, y2,
        25, height,
         5, y2,
        15, y2,
        15, 20 ]
    canvas.coords('poly', *coords)
    canvas.coords('line', *coords)

root = Tk()
root.title('tkinter Scale demo: controlling arrow drawn on Canvas')
try:
    root.option_readfile('lecture_options.txt')
except TclError:
    pass

canvas = Canvas(root, width=50, height=50, bd=0, highlightthickness=0)
canvas.create_polygon(0,0, 1,1, 2,2, fill='cadetblue', tags='poly')
canvas.create_line(0,0, 1,1, 2,2, 0,0, fill='black', tags='line')
scale = Scale(root, orient=VERTICAL, length=284, from_=0, to=250,
              tickinterval=50, command=setHeight)
scale.grid(row=0, column=0, sticky='NE')
canvas.grid(row=0, column=1, sticky='NWSE')
scale.set(100)
root.mainloop()
if runTkinter:
    !python3 demos/d*_grayson_verticalScaleWithArrow.py
Spinbox Widgets
Spinboxes display a value like an Entry, but have adjacent arrows to increment and decrement it.
%%file demos/d21_spinbox.py
from tkinter import *

tk = Tk()
tk.title('tkinter Spinbox demo')
try:
    tk.option_readfile('lecture_options.txt')
except TclError:
    pass

w = Spinbox(tk, from_=0, to=10)
w.grid()

mainloop()
if runTkinter:
    !python3 demos/d*_spinbox.py
Optionmenu Widgets
These usually look like buttons, but a horizontal bar on the right indicates that they have a pull-down menu associated with them. Here's a simple example:
%%file demos/d22_basicOptionmenu.py
from tkinter import *

tk = Tk()
tk.title('tkinter OptionMenu demo: basic')
try:
    tk.option_readfile('lecture_options.txt')
except TclError:
    pass

variable = StringVar(tk)
variable.set("one") # default value

w = OptionMenu(tk, variable, "one", "two", "three")
w.grid(row=0, column=0)

mainloop()
if runTkinter:
    !python3 demos/d*_basicOptionmenu.py
Here's a more elaborate example showing how to access the menu contents with a string text variable.
%%file demos/d23_getOptionmenu.py
from tkinter import *

tk = Tk()
tk.title("tkinter OptionMenu demo: getting the menu value")
try:
    tk.option_readfile('lecture_options.txt')
except TclError:
    pass

stringVar = StringVar(tk)
stringVar.set("one") # initial value

option = OptionMenu(tk, stringVar, "one", "two", "three", "four")
option.grid(row=0, column=0)

def onOkPress():
    print(f"value is {stringVar.get()!r}")
    tk.quit()

button = Button(tk, text="OK", command=onOkPress)
button.grid(row=0, column=1)

mainloop()
if runTkinter:
    !python3 demos/d*_getOptionmenu.py
Canvas Widgets
Canvases are for drawing 2D figures. Being a graphicist, these are my favorite tkinter widgets.
Default units for Canvases are usually pixels. (Font sizes are in points.) You can use other units by putting them in quotes with suffixes to indicate the units, e.g.:
"4in"(4 inches)"3.2cm"(3.2 centimeters)"8mm"(8 millimeters)
Notice how Python duck typing allows you to pass either strings or ints to the same tkinter functions or methods to set the sizes of things.
The coordinate system for Canvases puts the origin (0,0) in the upper left (like the rest of tkinter) with x increasing to the right and y increasing down. What you draw is clipped to the visible area of the Canvas.
Drawing Rectangles in Canvases
The create_rectangle(xUL, yUL, xLR, yLR, ...) method adds an axis-aligned rectangle with an upper left corner at (xUL, yUL) and a lower right corner at (xLR, yLR)to a Canvas.
%%file demos/d24_basicCanvas.py
from tkinter import *

tk = Tk()
tk.title('tkinter Canvas demo: basic')
try:
    tk.option_readfile('lecture_options.txt')
except TclError:
    pass

canvas = Canvas(tk, width=400, height=400)
#         (( xUL,   yUL),  (xLR,  yLR))
corners = (('10mm','2in'), (200, '4in'))
canvas.create_rectangle(corners, fill="Green")
canvas.grid()
tk.mainloop()
if runTkinter:
    !python3 demos/d*_basicCanvas.py
All 2D Graphics Primitives in Canvases
The following methods add 2D graphics primitives to a Canvas:
create_arc(xUL, yUL, xLR, yLR, ...)draws a slice out of an ellipse (or a circle).create_bitmap(x, y, ...)inserts a bitmap image.(x, y)is the anchor point.create_image(x, y, ...)inserts a graphic image.(x, y)is the anchor point.create_line(x0, y0, x1, y1, ...)draws one or more line segments.create_oval(xUL, yUL, xLR, yLR, ...)draws an ellipse; use this also for drawing circles, which are a special case of an ellipse. (Mathematical trivia: All ellipses are ovals, but not all ovals are ellipses.)create_polygon(x0, y0, x1, y1, ...)draws a polygon.create_rectangle(xUL, yUL, xLR, yLR, ...)draws a rectangle.create_text(x, y, ...)adds text annotation.(x, y)is the anchor point.create_window(x, y, ...)inserts a rectangular window that can contain any one widget (including aFrame).(x, y)is the anchor point.
Note that none of these entities creates an object or widget in the Python sense. (I find that slightly annoying, but I suppose there are reasons.) They return an id (not to be confused with a result of the Python id() builtin) that can be used to delete or modify the entity later.
We'll show an application that uses many of these primitives below.
Putting Images in Canvases
You can put images in Canvases with create_image().
Aside: If you really want to manipulate images, don't use Tkinter images. OpenCV (the cv2 package) is designed for image manipulation and its images work much better with numpy (later).
If necessary, we need to copy an image for use below.
if runTkinter:
    ![ -d demos/images ] || mkdir demos/images
    !cp images/nitobe.png demos/images
%%file demos/d25_nitobeCanvas.py
from tkinter import *

tk = Tk()
tk.title('tkinter Canvas demo: an image viewer')
img = PhotoImage(file='demos/images/nitobe.png')

cnvs = Canvas(tk, width=img.width(), height=img.height())
cnvs.create_image(0,0, image=img, anchor=NW)
cnvs.grid(row=0, column=0)

button = Button(tk, text='Quit', command=tk.quit)
button.grid(row=1, column=0, sticky=E)

tk.mainloop()
if runTkinter:
    !python3 demos/d*_nitobeCanvas.py
PhotoImage() understands most popular image file formats.
But I should point out a small annoyance with images. Let's try a program that should work identically to the above:
%%file demos/d26_buggyNitobeCanvas.py
from tkinter import *

root = Tk()
root.title('tkinter Canvas demo: a buggy image viewer')

def func():
    img = PhotoImage(file='demos/images/nitobe.png')

    cnvs = Canvas(root, width=img.width(), height=img.height())
    cnvs.create_image(0,0, image=img, anchor=NW)

    cnvs.grid(row=0, column=0)
    Button(root, text='Quit', command=root.quit).grid(row=1,column=0)

func()
root.mainloop()
if runTkinter:
    !python3 demos/d*_buggyNitobeCanvas.py
What happened to the image? All we did was put some of the code in a function. What could be wrong with that? Here's a hint: Add one line to func()...
%%file demos/d27_goodNitobeCanvas.py
from tkinter import *

root = Tk()
root.title('tkinter Canvas demo: a repaired image viewer')

def func():
    # Note the use of the "_" prefix to hint to the user
    # "don't mess with this unless you know what you're doing".
    global _img # prevents _img from garbage collection

    _img = PhotoImage(file='demos/images/nitobe.png')
    cnvs = Canvas(root, width=_img.width(), height=_img.height())
    cnvs.create_image(0,0, image=_img, anchor=NW)
    cnvs.grid(row=0, column=0)
    Button(root, text='Quit', command=root.quit).grid(row=1,column=0)

func()
root.mainloop()
if runTkinter:
    !python3 demos/d*_goodNitobeCanvas.py
... and everything works fine again. This works, too:
%%file demos/d28_alsoGoodNitobeCanvas.py
from tkinter import *

root = Tk()
root.title('tkinter Canvas demo: an alternatively-repaired image viewer')

# make img global (but somewhat hidden), so it's not garbage-collected
_img = PhotoImage(file='demos/images/nitobe.png')

def func():
    cnvs = Canvas(root, width=_img.width(), height=_img.height())
    cnvs.create_image(0,0, image=_img, anchor=NW)
    cnvs.grid(row=0, column=0)
    button = Button(root, text='Quit', command=root.quit)
    button.grid(row=1, column=0)

func()
root.mainloop()
if runTkinter:
    !python3 demos/d*_alsoGoodNitobeCanvas.py
LabelFrame Widgets
LabelFrames are Frames that provide a label and a border to group related widgets together more visibly to the user. These are particularly useful when have a large number of widgets.
%%file demos/d29_basicLabelFrame.py
from tkinter import *

root = Tk()
root.title('tkinter LabelFrame demo')
try:
    root.option_readfile('lecture_options.txt')
except TclError:
    pass

def addAttributes(frame, attrNames):
    for (row, attrName) in enumerate(attrNames):
        label = Label(frame, text=attrName + ":")
        label.grid(row=row, column=0, sticky=E)
        entry = Entry(frame, width=4)
        entry.grid(row=row, column=1, sticky=W)

heroFrame = LabelFrame(root, text="Hero Attributes", padx=5, pady=5)
heroFrame.grid(row=0, column=0)

heroAttrNames = ("strength", "wisdom", "intelligence", "dexterity")
addAttributes(heroFrame, heroAttrNames)

sidekickFrame = LabelFrame(root, text="Sidekick Attributes", padx=5, pady=5)
sidekickFrame.grid(row=1, column=0)

sidekickAttrNames = ("wimpiness", "foolishness", "ignorance", "clumsiness")
addAttributes(sidekickFrame, sidekickAttrNames)

root.mainloop()
if runTkinter:
    !python3 demos/d*_basicLabelFrame.py
Events in tkinter.
Like most GUI frameworks, tkinter is "event-based". Once you call the mainloop() method, tkinter puts you in an event loop where it waits for one or more events to happen. Events can be mouse clicks, key presses, timer timeouts, mouse motion, etc. When one does, it calls an event handler (i.e. a callback). When the event handler has done whatever it needs to do (assuming it doesn't exit the program), a return from it resumes the event loop, which then waits for the next event.
We're already using some built-in event handlers: Users can type stuff into text widgets (e.g. Text, Entry) and many widgets have a "command=" callback, but we can get a lot more different kinds of control by binding events to objects.
Here's a program that prints out some information about events associated with Buttons and Frames.
%%file demos/d30_handleButtonFrameEvents.py
from tkinter import *

tk = Tk()
tk.title('tkinter Event demo: handle Button and Frame Events')
try:
    tk.option_readfile('lecture_options.txt')
except TclError:
    pass

# Watch for these events in the Frame and the Button. (These
# are taken from the New Mexico Tech Tkinter documentation.)
eventTypeNames = (
    "ButtonPress", # "Button" is equivalent
    "ButtonRelease",
    "Enter",
    "KeyPress",
    "KeyRelease",
    "Leave",
    "Motion",
)

# print a header
print("{:15s} {:10s} {:>4s} {:>4s}".format(
      "event type", "widget", "x", "y"))

def handler(event):
    eventTypeName = str(event.type)
    widgetClassName = event.widget.__class__.__name__
    print("\r{:15s} {:10s} {:>4d} {:>4d}".format(
            eventTypeName, widgetClassName, event.x, event.y),
            end="")

def bindHandler(widget):
    for eventTypeName in eventTypeNames:
        eventSpec = f'<Any-{eventTypeName}>'
        widget.bind(eventSpec, handler)

frame = Frame(tk, width=150, height=150)
bindHandler(frame)
frame.grid()

btn = Button(frame, text='Press and Release Me')
bindHandler(btn)
btn.grid(padx=20, pady=20)

tk.mainloop()
if runTkinter:
    !python3 demos/d*_handleButtonFrameEvents.py
Events can also be triggered by changes to the window like resizes or deletion.
%%file demos/d31_handleConfigureEvents.py
from tkinter import *


# Watch for these events in the window. (These
# are taken from the New Mexico Tech Tkinter documentation.)
eventTypeNames = (
    "Configure",
    "Destroy",
    "Enter",
    "Expose",
    "FocusIn",
    "FocusOut",
    "Leave",
    "Visibility",
)

# print a header
print("{:15s} {:15s} {:>8s} {:>8s} {:>8s} {:>8s}".format(
      "event type", "widget class", "width", "height", "rootx", "rooty"))

def handler(event):
    eventTypeName = str(event.type)
    widget = event.widget
    widgetClassName = widget.__class__.__name__
    widgetWidth = widget.winfo_width()
    widgetHeight = widget.winfo_height()
    widgetRootX = widget.winfo_rootx()
    widgetRootY = widget.winfo_rooty()
    print("\r{:15s} {:15s} {:>8d} {:>8d} {:>8d} {:>8d}".format(
            eventTypeName, widgetClassName, widgetWidth, widgetHeight,
            widgetRootX, widgetRootY),
            end="")

def bindHandler(widget):
    for eventTypeName in eventTypeNames:
        eventSpec = f'<{eventTypeName}>'
        widget.bind(eventSpec, handler)

tk = Tk()
tk.title('tkinter Event demo: handle Configure Events')
try:
    tk.option_readfile('lecture_options.txt')
except TclError:
    pass
bindHandler(tk)
label = Label(tk, text='A Window (i.e., a Tk)')
label.grid()

tk.mainloop()
if runTkinter:
    !python3 demos/d31_handleConfigureEvents.py
There's an extensive syntax to specify events inherited from Tck/Tk:
Some Substantial tkinter Applications
To put all of this together, let's look at some larger Tkinter applications.
hanoi: The "Towers of Hanoi" Visualization
The "Towers of Hanoi" is a classic puzzle. The idea is to move disks of decreasing size from the left of three towers to the right tower, one disk at a time, without ever putting a larger disk on top of a smaller one. Here is a text-based solution that illustrates the algorithm:
%%file demos/d32_hanoiText.py
from sys import argv

if len(argv) == 2:
    height = int(argv[1])
else:
    height = 4

towerLeft = list(range(height))
towerLeft.reverse()
towerMiddle = []
towerRight = []

def printTowers():
    print("%-20s" % str(towerLeft), \
          "%-20s" % str(towerMiddle), \
          "%-20s" % str(towerRight))

def hanoi(n, towerFrom, towerTo, towerTemp):
    if n == 0:
        return
    hanoi(n-1, towerFrom, towerTemp, towerTo)
    towerTo.append(towerFrom[-1])
    del towerFrom[-1]
    printTowers()
    hanoi(n-1, towerTemp, towerTo, towerFrom)

printTowers()
hanoi(len(towerLeft), towerLeft, towerRight, towerMiddle)
!python3 demos/d*_hanoiText.py
Notice that we can pass an argument to the above to vary the number of disks.
if runTkinter:
    !python3 demos/d*_hanoiText.py 3
We can use tkinter to build a visualization for this algorithm:
%%file applications/hanoi.py
from tkinter import *
from sys import argv


class LastStepReached(Exception):
    pass  # exception to prematurely exit recursive algorithm


class HanoiCanvas(Canvas):

    def __init__(self, parent, nDisks, canvasWidth = 600):
        self.nDisks = nDisks
        self.diskHeight = 20
        self.diskMinWidth = 2 * self.diskHeight
        self.diskMaxWidth = (canvasWidth - 30) / 3
        self.canvasWidth = canvasWidth
        self.canvasHeight = (nDisks + 2) * self.diskHeight
        super().__init__(parent, width=self.canvasWidth, height=self.canvasHeight)
        self.running = 0
        self.restart()

    def drawTower(self, tower, xCtr):
        y = self.canvasHeight - 2.0 * self.diskHeight
        colors = [ 'red', 'orange', 'yellow', 'green', 'blue', 'violet' ]
        for disk in tower:
            wDisc = self.diskMinWidth \
                    + (self.diskMaxWidth - self.diskMinWidth) * (disk + 1) \
                      / self.nDisks
            self.create_oval(xCtr - wDisc / 2, y+2,
                                  xCtr + wDisc / 2, y+self.diskHeight,
                                  tag='tower',
                                  fill=colors[disk % len(colors)],
                                  outline='black')
            y = y - self.diskHeight

    @property
    def interval(self):
        return int(1001.0 / speedIntVar.get())

    def hanoi(self, n, stackFrom, stackTo, stackTemp):
        if n == 0:
            return
        # move n-1 disks from stackFrom to stackTemp
        self.hanoi(n-1, stackFrom, stackTemp, stackTo)
        # transfer the top disk on stackFrom to the top of stackTo
        stackTo.append(stackFrom[-1])
        del stackFrom[-1]
        self.curStep = self.curStep + 1
        if self.curStep == self.lastStep:
            raise LastStepReached
        # move n-1 disks from stackTemp to stackTo
        self.hanoi(n-1, stackTemp, stackTo, stackFrom)

    def reset(self):
        self.left = list(range(self.nDisks))
        self.left = list(reversed(self.left))
        self.middle = []
        self.right = []

    def redraw(self):
        self.delete('tower')
        y = self.canvasHeight - self.diskHeight
        # this creates the base
        self.create_rectangle(10,
                                   y,
                                   self.canvasWidth - 10,
                                   y + 0.5 * self.diskHeight,
                                   fill='brown',
                                   outline='black',
                                   tag='tower')
        # this creates the towers
        for (twr, xCtr) in ((self.left, self.canvasWidth / 6),
                            (self.middle, self.canvasWidth / 2),
                            (self.right, 5 * self.canvasWidth / 6)):
            self.create_rectangle(
                    xCtr-5,
                    y,
                    xCtr+5,
                    y - (self.nDisks + 0.5) * self.diskHeight,
                    fill='brown',
                    outline='black',
                    tag='tower')
            self.drawTower(twr, xCtr)
        self.update()

    def restart(self):
        self.lastStep = 0
        self.curStep = 0
        self.reset()
        self.redraw()

    def setSpeed(self, r):
        pass

    def startRun(self):
        tk.after(self.interval, self.stepRun)
        self.running = 1

    def stopRun(self):
        self.running = 0

    def step(self):
        self.reset()
        self.lastStep = self.lastStep + 1
        self.curStep = 0
        try:
            self.hanoi(len(self.left), self.left, self.right, self.middle)
        except LastStepReached:
            self.redraw()

    def stepRun(self):
        self.step()
        if self.running and (self.left or self.middle): # reschedule itself
            tk.after(self.interval, self.stepRun)

if __name__ == '__main__':
    tk = Tk()
    tk.title('The Towers of Hanoi')

    if len(argv) == 2:
        nDisks = int(argv[1])
    else:
        nDisks = 3

    hanoiCanvas = HanoiCanvas(tk, nDisks)
    buttonWidth = 20
    runButton = Button(tk, text='Run', width=buttonWidth, command=hanoiCanvas.startRun)
    stopButton = Button(tk, text='Stop', width=buttonWidth, command=hanoiCanvas.stopRun)
    stepButton = Button(tk, text='Step', width=buttonWidth, command=hanoiCanvas.step)
    restartButton = Button(tk, text='Restart', width=buttonWidth, command=hanoiCanvas.restart)
    speedLabel = Label(tk, text="Speed (Hz): ")

    speedIntVar = IntVar()
    speedIntVar.set(1) # default update interval is 1 sec (1000 msec)

    # tk.after() uses milliseconds, so the maximum speed is 1000 Hz
    scale = Scale(tk, orient=HORIZONTAL, length=300,
                  from_=1, to=1000, variable=speedIntVar)

    quitButton = Button(tk, text='Quit', width=buttonWidth, command=tk.quit)

    row = 1
    column = 0
    runButton.grid(row=row, column=column, sticky='ew')
    column += 1
    stopButton.grid(row=row, column=column, sticky='ew')
    column += 1
    stepButton.grid(row=row, column=column, sticky='ew')
    column += 1
    restartButton.grid(row=row, column=column, sticky='ew')
    column += 1
    mxnColumns = column

    row = 0
    column = 0
    hanoiCanvas.grid(row=row, column=column, columnspan=mxnColumns)

    row = 2
    column = 0
    speedLabel.grid(row=row, column=column, sticky='e')
    column += 1
    scale.grid(row=row, column=column, columnspan=mxnColumns-2, sticky='w')
    column += mxnColumns-2
    quitButton.grid(row=row, column=column, sticky='ew')
    column += 1

    tk.mainloop()
if runTkinter:
    !python3 applications/hanoi.py 15
lmprop: a static illustration of light propagation
Here's a program I created for a research project I was working on in light propagation.
%%file applications/lmprop.py
import PIL.Image as pilImage
import tkinter as tk
import numpy as np
import collections
from pprint import pprint

EPS = 1.0e-8 # (feeble) attempt to account for roundoff

Intersection = collections.namedtuple('Intersection', ('p', 't'))


def createOrientedSquare(centerPoint, wh, u):
    """create a wh x wh square centered on centerPoint w/one edge || to u
    """
    u /= mag(u)
    v = np.array((-u[1], u[0]))
    return (centerPoint - wh/2 * u - wh/2 * v,
            centerPoint + wh/2 * u - wh/2 * v,
            centerPoint + wh/2 * u + wh/2 * v,
            centerPoint - wh/2 * u + wh/2 * v)


def createRegularPolygon(centerPoint, radius, nSides, phaseDeg=0.0):
    dTheta = 2 * np.pi / nSides
    phase = phaseDeg * np.pi / 180
    polygon = []
    for i in range(nSides):
        theta = i * dTheta
        dx = radius * np.cos(theta - phase)
        dy = radius * np.sin(theta - phase)
        p = centerPoint + np.array((dx, -dy))
        polygon.append(p)
    return polygon


def lineThroughPoints(p0, p1):
    """returns the line that passes through points p0 and p1

    it returns (p0, n) where p0 is an arbitrary point on the line and n is
    a normal to the the line, which is defined by n . (p - p0) = 0 for any
    point p on the line.
    """
    dx = p1[0] - p0[0]
    dy = p1[1] - p0[1]
    # If dx & dy are positive, the positive half-plane is SE of the line.
    mag = (dx**2 + dy**2)**0.5
    n = (dy/mag, -dx/mag)
    return (p0, n)


def mag(v):
    return np.linalg.norm(v)


def normalize(v):
    return v / mag(v)


class Ray:

    def __init__(self, o, d):
        """the ray is of the form o+dt
        """
        self.o = o
        self.d = d

    def intersectsLine(self, p0, n):
        """returns the intersection of the ray with a line (or None)

        the line is (p-p0).n = 0
        """
        nDotD = np.dot(n, self.d)
        if np.abs(nDotD) < EPS:
            # If the ray begins on the line, its direction doesn't matter.
            if mag(self.o - p0) < EPS:
                return Intersection(self.o, 0.0)
            else:
                return None
        t = np.dot(n, p0 - self.o) / nDotD
        if t < 0: # t must be positive for the ray to intersect
            return None
        p = self.o + self.d * t
        return Intersection(p, t)

    def intersectsLineSegment(self, p0, p1):
        (pOnLine, n) = lineThroughPoints(p0, p1)
        intersection = self.intersectsLine(pOnLine, n)
        if intersection is None:
            return None

        # At this point, the ray intersects the line defined by the
        # points, but to intersect the line segment, the intersection must
        # lie between them. We'll do this by seeing if the vectors from
        # the endpoints to the intersection are antiparallel.
        v0 = intersection.p - p0
        v1 = intersection.p - p1
        result = intersection if np.dot(v0, v1) <= 0 else None
        return result

    def intersectsPolygon(self, polygon):
        """returns a list of intersections of the ray with a polygon (or [])
        """
        n = len(polygon)
        result = []
        for i in range(n):
            p0 = polygon[i]
            p1 = polygon[(i+1) % n]
            intersection = self.intersectsLineSegment(p0, p1)
            if intersection:
                result.append(intersection)
        def getT(intersection):
            return intersection.t
        return sorted(result, key=getT)


class Application(tk.Frame):

    def __init__(self, parent, nCellRows, nCellColumns, *args, **kwargs):
        super().__init__(parent, *args, **kwargs)
        self.canvas = Canvas(self, nCellRows, nCellColumns)
        self.canvas.grid(row=0, column=0)


class Canvas(tk.Canvas):

    CELL_ARRAY_OFFSET = 30 # of cell array within canvas, allowing for labels

    def __init__(self, parent, nCellRows, nCellColumns):
        self.nCellRows = nCellRows
        self.nCellColumns= nCellColumns
        self.width = self.nCellColumns * Cell.WH + Canvas.CELL_ARRAY_OFFSET
        self.height = self.nCellRows * Cell.WH + Canvas.CELL_ARRAY_OFFSET
        super().__init__(parent,
                         width=self.width, height=self.height,
                         background='white')

        self.corners = (
            (Cell.INSET, Cell.INSET),
            (Cell.INSET, self.height - Cell.INSET),
            (self.width - Cell.INSET, self.height - Cell.INSET),
            (self.width - Cell.INSET, Cell.INSET))

        self.cells = {}
        for i in range(self.nCellRows):
            for j in range(self.nCellColumns):
                self.cells[i,j] = Cell(self, i, j)
        for j in range(self.nCellColumns):
            self.drawText(((j + 0.5) * Cell.WH + Canvas.CELL_ARRAY_OFFSET,
                           0.5 * Canvas.CELL_ARRAY_OFFSET),
                          "{}".format(j), font=("Times", 16))
        for i in range(self.nCellColumns):
            self.drawText((0.5 * Canvas.CELL_ARRAY_OFFSET,
                          (i + 0.5) * Cell.WH + Canvas.CELL_ARRAY_OFFSET),
                          "{}".format(i), font=("Times", 16))


    def drawArrow(self, p0, p1, **kwargs):
        d = 15 * normalize(p1 - p0)
        dPerp = np.array((d[1], -d[0]))
        polygon = ( p1,
                    p1 - d - dPerp/4,
                    p1 - 0.75 * d,
                    p1 - d + dPerp/4 )
        if 'fill' not in kwargs:
            kwargs['fill'] = 'black'
        self.drawPolygon(polygon, **kwargs)
        self.create_line(p0[0], p0[1], p1[0], p1[1], **kwargs)

    def drawCircle(self, pCtr, r, **kwargs):
        if 'fill' not in kwargs:
            kwargs['fill'] = 'light green' # default
        return self.create_oval((pCtr[0] - r, pCtr[1] - r),
                                (pCtr[0] + r, pCtr[1] + r), **kwargs)

    def drawImage(self, p, image, **kwargs):
        return self.create_image(p[0], p[1], image=image, **kwargs)

    def drawLine(self, p0, p1, **kwargs):
        return self.create_line(p0[0], p0[1], p1[0], p1[1], **kwargs)

    def drawPolygon(self, polygon, **kwargs):
        # convert arrays, if need be
        return self.create_polygon([ tuple(p) for p in polygon ],
                                   **kwargs)

    def drawRay(self, ray, **kwargs):
        edgePoint = None
        for i in range(4):
            p0 = self.corners[i]
            p1 = self.corners[(i+1) % 4]
            (p0, n) = lineThroughPoints(p0, p1)
            intersection = ray.intersectsLine(p0, n)
            if intersection is not None:
                if edgePoint is None \
                       or mag(intersection.p - ray.o) < mag(edgePoint - ray.o):
                    edgePoint = intersection.p
        if edgePoint is not None:
            self.drawArrow(ray.o, edgePoint)

    def drawRectangle(self, pUL, pLR, **kwargs):
        if 'fill' not in kwargs:
            kwargs['fill'] = 'light green' # default
        return self.create_rectangle(pUL[0], pUL[1], pLR[0], pLR[1], **kwargs)

    def drawRayTrace(self, eyePoint, viewDirection, fovDeg, polygon):
        d = mag(viewDirection)
        pViewCenter = eyePoint + viewDirection
        normalizedViewDirection = normalize(viewDirection)

        # perpendicular to the view direction
        normalizedViewDirectionPerp = normalize(np.array((viewDirection[1],
                                                          -viewDirection[0])))

        fov = fovDeg * np.pi / 180
        halfW = d * np.tan(fov/2)

        p0 = pViewCenter + halfW * normalizedViewDirectionPerp
        p1 = pViewCenter - halfW * normalizedViewDirectionPerp
        viewPlane = Mesh(self, p0, p1, 7)

        nSamples = len(viewPlane.samplePoints)
        w = 2 * halfW
        pixelWH = w / (nSamples - 1)

        for samplePoint in viewPlane.samplePoints:
            pixelPolygon = createOrientedSquare(samplePoint, pixelWH,
                                                viewDirection)
            ray = Ray(eyePoint, samplePoint - eyePoint)
            intersections = ray.intersectsPolygon(polygon)
            if intersections:
                self.drawArrow(eyePoint, intersections[0].p)
                self.drawPolygon(pixelPolygon, fill='blue',
                                 outline='black', width=1)
            else:
                self.drawRay(ray)
                self.drawPolygon(pixelPolygon, fill='gray80',
                                 outline='black', width=1)

        # need to save image reference so it won't be garbage-collected
        self.image = tk.PhotoImage(file="applications/images/eye_rev.png")
        self.drawImage(eyePoint, self.image)

    def drawText(self, p, text, **kwargs):
        return self.create_text(p, text=text, **kwargs)

    def xyPosition(self, x, y):
        return np.array((x * Cell.WH + Canvas.CELL_ARRAY_OFFSET,
                         y * Cell.WH + Canvas.CELL_ARRAY_OFFSET), dtype=float)

    def xyDirection(self, dx, dy):
        return np.array((dx * Cell.WH, dy * Cell.WH), dtype=float)


class Cell:

    WH = 300 # width and height of (square) cells
    WALL_MESH_RESOLUTION = 9
    INSET = 1  # distinguish cell walls

    def __init__(self, canvas, i, j):
        self.pUL = np.array(
            (j       * Cell.WH + Cell.INSET + Canvas.CELL_ARRAY_OFFSET,
             i       * Cell.WH + Cell.INSET + Canvas.CELL_ARRAY_OFFSET))
        self.pLR = np.array((
            (j + 1) * Cell.WH - Cell.INSET + Canvas.CELL_ARRAY_OFFSET,
            (i + 1) * Cell.WH - Cell.INSET + Canvas.CELL_ARRAY_OFFSET))
        self.canvas = canvas
        self.walls = []
        for (x0, y0, x1, y1) in (
                (self.pUL[0], self.pUL[1], self.pUL[0], self.pLR[1]),
                (self.pUL[0], self.pLR[1], self.pLR[0], self.pLR[1]),
                (self.pLR[0], self.pLR[1], self.pLR[0], self.pUL[1]),
                (self.pLR[0], self.pUL[1], self.pUL[0], self.pUL[1])):
            p0 = np.array((x0, y0))
            p1 = np.array((x1, y1))
            wall = Mesh(self.canvas, p0, p1, Cell.WALL_MESH_RESOLUTION)
            self.walls.append(wall)

        pUL = np.array((self.pUL[0], self.pUL[1]))
        pLR = np.array((self.pLR[0], self.pLR[1]))
        self.backgroundId = self.canvas.drawRectangle(pUL, pLR)
        self.setHighlight(False)

    def drawBlocking(self, pLight, wallIndex, blockingPolygon, wallTo):
        intercedingWall = self.walls[wallIndex]
        for i in range(Cell.WALL_MESH_RESOLUTION):
            pTo = wallTo.samplePoints[i]
            o = pLight
            d = normalize(pTo - o)
            ray = Ray(o, d)

            wallIntersection = intercedingWall.intersectsRay(ray)
            if wallIntersection is not None:
                self.canvas.drawLine(pLight, wallIntersection.p)
                self.canvas.drawArrow(wallIntersection.p,
                                      wallIntersection.p + 20*d)
                blockingIntersections = ray.intersectsPolygon(blockingPolygon)
                if blockingIntersections:
                    self.canvas.drawArrow(wallIntersection.p,
                                     blockingIntersections[0].p)
                    self.canvas.drawLine(blockingIntersections[1].p,
                                    pTo, fill='gray50')
                else:
                    self.canvas.drawLine(wallIntersection.p, pTo)
                    self.canvas.drawArrow(pTo, pTo + 20*d)
            else:
                self.canvas.drawLine(pLight, pTo, fill='gray50')

    def setHighlight(self, status):
        self.canvas.itemconfigure(self.backgroundId,
                                  fill= 'white' if status else 'gray80')


class Mesh:
    """This is a 1D mesh analogous to a more conventional 2D or 3D mesh.
    """

    def __init__(self, canvas, p0, p1, nSamples):
        self.canvas = canvas
        self.p0 = p0
        self.p1 = p1
        d = 1 / (nSamples - 1) # spacing between vertices
        self.samplePoints = []
        for i in range(nSamples):
            t = i * d
            p = self.p0 + t * (self.p1 - self.p0)
            self.samplePoints.append(p)
        self.canvas.drawLine(self.p0, self.p1)

    def line(self):
        """returns the line the wall intersects

        it returns (p0, n) where p0 is an arbitrary point on the line and n is
        a normal to the the line, which is defined by n . (p - p0) = 0 for any
        point p on the line.
        """
        return lineThroughPoints(self.p0, self.p1)

    def intersectsRay(self, ray):
        """returns true iff ray intersects the wall
        """
        return ray.intersectsLineSegment(self.p0, self.p1)


def drawFrame0(canvas):
    pLight = canvas.xyPosition(0.3, 0.4)

    illuminatedCell = canvas.cells[canvas.nCellRows-1, canvas.nCellColumns-1]
    illuminatedWall = illuminatedCell.walls[0]

    blockingCell = canvas.cells[0, 1]
    blockingCell.setHighlight(True)

    blockingPolygon = createRegularPolygon(canvas.xyPosition(1.2, 0.8), 15, 6)
    canvas.drawPolygon(blockingPolygon, fill='cyan', outline='black', width=1)

    blockingCell.drawBlocking(pLight, 0, blockingPolygon, illuminatedWall)

    canvas.drawCircle(pLight, 10, fill='yellow')

    targetPolygon = createRegularPolygon(canvas.xyPosition(2.4, 1.5), 80, 10,
                                         phaseDeg=10)
    canvas.drawPolygon(targetPolygon, fill='blue', outline='black', width=1)

    canvas.drawRayTrace(eyePoint = canvas.xyPosition(0.3, 1.25),
                        viewDirection = canvas.xyDirection(0.6, 0.03),
                        fovDeg = 30,
                        polygon = targetPolygon)


def onKey(event, application):
    widget = event.widget
    if event.char == 'p':
        application.canvas.postscript(file="lmprop.ps")
    elif event.char == 'q':
        widget.quit()
    elif event.char == '0':
        pass


def main():
    root = tk.Tk()
    application = Application(root,
                              nCellRows = 2,
                              nCellColumns = 3)
    application.grid(row=0, column=0)
    application.bind_all("<Key>",
              lambda event, application=application: onKey(event, application))

    drawFrame0(application.canvas)
    root.mainloop()


if __name__ == '__main__':
    main()
Tkinter allows you to capture the canvas as a PostScript image "lmprop.ps" by pressing the "p" key. PostScript, however, is kind of passe, so we'll convert it to PNG so we can embed it in this notebook.
if runTkinter:
    !python3 applications/lmprop.py
    # "convert" comes from the (widely-used) ImageMagick package
    ![ -r lmprop.ps ] && convert lmprop.ps applications/images/lmprop.png
    !rm -f lmprop.ps # cleanup
Here is the result:
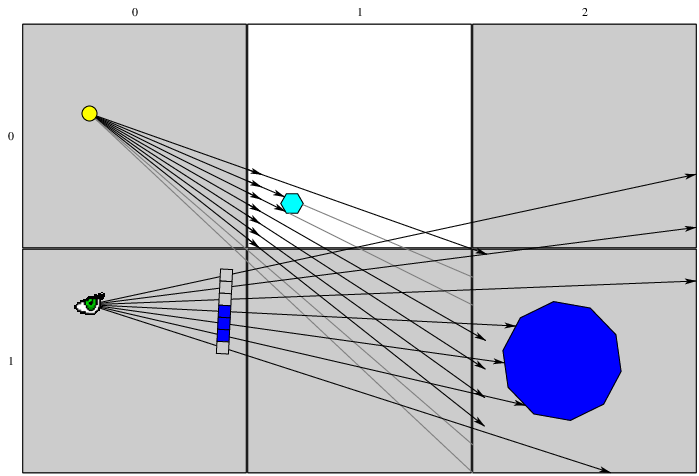
pyckett, an Interactive Slide Rule
Another example of Canvas graphics is the interactive pyckett program:
%%file applications/pyckett.py
"""
This program is an interactively emulates much of the functionality
of a Pickett slide rule, hence the name.  The center bar and slider
move with the left mouse button. Remember to keep fingerprints off
the clear plastic!

If you find it useful or amusing, let me know, but no warranty is
expressed or implied.

If you want to contribute to further development, it's on Sourceforge.
"""

from tkinter import *
from math import log10, pi


class Moveable:
    """This is a mixin class to make other classes that inherit from it
    moveable."""
    def __init__(self, rule, xMin=None, xMax=None):
        self.x = 0
        self.rule = rule
        self.wxPrev = None
        self.xMin = xMin
        self.xMax = xMax
        # Moveable objects should have tags bound to them.
        rule.tag_bind(self.tag, '<ButtonPress-1>', self.evtPress)
        rule.tag_bind(self.tag, '<Button1-Motion>', self.evtMotion)

    def evtPress(self, evt):
        self.wxPrev = evt.x

    def evtMotion(self, evt):
        dx = evt.x - self.wxPrev
        if self.xMax is not None:
            xNew = self.x + dx
            if xNew < self.xMin:
                xNew = self.xMin
                dx = xNew - self.x
            elif xNew > self.xMax:
                xNew = self.xMax
                dx = xNew - self.x
            self.x = xNew
        self.rule.move(self.tag, dx, 0)
        self.wxPrev = evt.x


class Bar:
    """One of the labelled bars of the slide rule."""
    def __init__(self, cnvs, x0, y0, w, h, xOff, tag=None):
        self.cnvs = cnvs
        self.x0 = x0
        self.y0 = y0
        self.w = w
        self.xOff = xOff
        self.tag = tag

        self.scaleW = w - 2*xOff
        self.scaleX0 = x0 + xOff
        cnvs.create_rectangle(x0, y0, x0+w, y0+h, fill='yellow', tag=tag)

    def addScale(self, label, dy0, nDec, hTickLabelled):
        if label[0] in 'ABCDK':
            LogScale(self.cnvs, label, self.y0 + dy0, self.scaleX0,
                     self.scaleW, nDec, hTickLabelled, self.tag)
        elif label == 'L':
            LinearScale(self.cnvs, label, self.y0 + dy0, self.scaleX0,
                     self.scaleW, hTickLabelled, self.tag)


class MoveableBar(Bar,Moveable):
    """A labelled bar of the slide rule that can move."""
    def __init__(self, rule, x0, y0, w, h, xOff, xMax):
        Bar.__init__(self, rule, x0, y0, w, h, xOff, 'centerbar')
        Moveable.__init__(self, rule, -xMax, xMax)


class LinearScale:
    """A linear scale."""
    def __init__(self, cnvs, lbl, y0, x0, w, hTickCoarse, tag=None):
        self.x0 = x0
        self.w = w

        fontLbl = ("Helvetica", 10)

        if hTickCoarse < 0:
            anchDgt = N
            anchLblL = NE
            anchLblR = NW
        else:
            anchDgt = S
            anchLblL = SE
            anchLblR = SW

        hTickMedium = hTickCoarse / 2
        b = 15 # x offset of label from start of scale
        cnvs.create_text(x0 - b, y0-hTickCoarse/12, text=lbl,
                         anchor=anchLblL, fill='black', tag=tag, font=fontLbl)
        cnvs.create_text(x0 + w + b, y0-hTickCoarse/12, text=lbl,
                         anchor=anchLblR, fill='black', tag=tag, font=fontLbl)

        fontDgt = ("Helvetica", 8)
        for iTickCoarse in range(11):  # allows for '1' tick at end
            t = iTickCoarse / 10.0
            x = self.xOfVal(t)
            cnvs.create_line(x, y0, x, y0-hTickCoarse/4, fill='black', tag=tag)
            if iTickCoarse == 0:
                sVal = '0'
            elif iTickCoarse == 10:
                sVal = '1'
            else:
                sVal = '.' + str(iTickCoarse)
            cnvs.create_text(x, y0-5*hTickCoarse/16, text=sVal,
                             anchor=anchDgt, fill='black', tag=tag,
                             font=fontDgt)
            if iTickCoarse == 10:  # we only want the '1' tick
                continue
            for iTickMedium in range(9):
                t = 0.1 * iTickCoarse + 0.01 * (iTickMedium + 1)
                x = self.xOfVal(t)
                hTick = hTickMedium
                if iTickMedium == 4: # make the midpoint longer
                    hTick = hTickCoarse
                cnvs.create_line(x, y0, x, y0-hTick, fill='black', tag=tag)

    def xOfVal(self, val):
        return self.x0 + val * self.w


class LogScale:
    """A logarithmic scale with a variable number of decades that may also
    be inverted (go from right-to-left)."""
    def __init__(self, cnvs, lbl, y0, x0, w, nDec, hTickCoarse, tag=None):
        self.x0 = x0
        self.w = w
        self.nDec = nDec

        if 'F' in lbl:
            self.v0 = pi
        else:
            self.v0 = 0
        self.inverse = 'I' in lbl # convention

        nTickMediumPerCoarse = 10
        nTickCoarse = 10 * nDec
        nTick = (10**nDec - 1) * nTickMediumPerCoarse + 1

        fontLbl = ("Helvetica", 10)
        fontSym = ("Symbol", 10)
        if nDec < 3:  # use a larger font for two or fewer decades
            fontDgtNormal = fontLbl
            fontDgtSmall = ("Helvetica", 8)
        else:
            fontDgtNormal = ("Helvetica", 8)
            fontDgtSmall = ("Helvetica", 6)

        if hTickCoarse < 0:
            anchDgt = N
            anchLblL = NE
            anchLblR = NW
        else:
            anchDgt = S
            anchLblL = SE
            anchLblR = SW

        if self.inverse:
            fllDgt = fllLbl = 'red'
        else:
            fllDgt = fllLbl = 'black'

        b = 15 # x offset of label from start of scale
        cnvs.create_text(x0 - b, y0-hTickCoarse/12, text=lbl,
                         anchor=anchLblL, fill=fllLbl, tag=tag, font=fontLbl)
        cnvs.create_text(x0 + w + b, y0-hTickCoarse/12, text=lbl,
                         anchor=anchLblR, fill=fllLbl, tag=tag, font=fontLbl)

        tick = 0
        # we span one more decade than nDec to get the major tick at the end
        for dec in range(nDec+1):
            dTick = 10.0**(dec-1)
            for iTickCoarse in range(9):
                x = self.xOfVal(tick+1)
                cnvs.create_line(x, y0, x, y0-hTickCoarse/4, fill='black',
                                 tag=tag)
                txt = self.lbl(iTickCoarse+1)
                cnvs.create_text(x, y0-hTickCoarse/4, text=txt,
                                 anchor=anchDgt, fill=fllDgt, tag=tag,
                                 font=fontDgtNormal)
                if dec == nDec:  # draws just the major tick of the next decade
                    break
                tick = tick + dTick
                for iTickMedium in range(9):
                    x = self.xOfVal(tick+1)

                    # Make the "5" tick longer than the rest (but see below).
                    if iTickMedium == 4:
                        hTickMedium = hTickCoarse
                    else:
                        hTickMedium = hTickCoarse/2

                    # If there's only one decade, show more detail in the
                    # [1..2] interval.
                    if nDec == 1 and iTickCoarse == 0:
                        txt = self.lbl(iTickMedium+1)
                        cnvs.create_text(x, y0-hTickCoarse/4, text=txt,
                                         anchor=NW, fill=fllDgt, tag=tag,
                                         font=fontDgtSmall)
                        # override tick labelled '5' for this decade
                        hTickMedium = hTickCoarse/2

                    cnvs.create_line(x, y0, x, y0-hTickMedium,
                                     fill='black', tag=tag)

                    tick = tick + dTick

        # If there are two or fewer decades, draw a tick at pi (on all
        # decades).
        if nDec <= 2:
            for dec in range(nDec):
                x = self.xOfVal(pi * 10**dec)
                cnvs.create_line(x, y0, x, y0-hTickCoarse, fill='black',
                                 tag=tag)
                cnvs.create_text(x, y0-hTickMedium/2, text='p',
                                 font=fontSym, anchor=anchDgt, fill=fllDgt,
                                 tag=tag)

        # If there's only one decade and this is not an 'F' scale,
        # draw a tick labelled 'R' at 180/pi (actually, 18/pi).
        if nDec == 1 and lbl[-1] != 'F':
            x = self.xOfVal(18.0/pi)
            cnvs.create_line(x, y0, x, y0-hTickCoarse, fill='black', tag=tag)
            cnvs.create_text(x, y0-hTickMedium/2, text='R',
                             font=fontDgtSmall, anchor=anchDgt, fill=fllDgt,
                             tag=tag)

    def lbl(self, val):
        txt = str(val)
        if self.inverse:  # another convention
            txt = '<' + txt
        return txt

    def xOfVal(self, val):
        t = log10(val) / self.nDec
        if self.v0 != 0:
            t0 = log10(self.v0) / self.nDec
            t = ((t-t0) % 1)
        if self.inverse:
            t = 1 - t
        return self.x0 + t * self.w


class Cursor(Moveable):

    def __init__(self, rule, xCtr, w, xMax):
        self.tag = 'cursor'
        self.rule = rule

        x0 = xCtr-w/2

        Moveable.__init__(self, rule, 0, xMax)

        hSlider = rule.h / 8.0

        # amount by which slider extends beyond cursor (on three sides)
        protrude = hSlider/6.0

        # draw the sliders themselves
        y0 = rule.y - hSlider
        rule.draw_beveled_rect(x0-protrude, y0, w + 2*protrude, hSlider, 2,
                               tag=self.tag)
        y1 = rule.y + rule.h
        rule.draw_beveled_rect(x0-protrude, y1, w + 2*protrude, hSlider, 2,
                               tag=self.tag)

        plastY0 = rule.y - hSlider + protrude
        plastY1 = y1 + hSlider - protrude

        rule.draw_beveled_rect(x0, plastY0, w, plastY1 - plastY0,
                               3, 1, tag=self.tag)

        rule.create_line(xCtr, y0+hSlider+protrude, xCtr, y1-protrude,
                         fill='red', tag=self.tag)  # cursor line itself

        # draw screws on the slider
        r = hSlider/8.0 # radius of screw

        # horizontal and vertical offsets of screw from edge
        d = hSlider/2.0 - r

        rule.draw_screw_head(x0 + d,     plastY0 + d, r, tag=self.tag)
        rule.draw_screw_head(x0 + w - d, plastY0 + d, r, tag=self.tag)
        rule.draw_screw_head(x0 + d,     plastY1 - d, r, tag=self.tag)
        rule.draw_screw_head(x0 + w - d, plastY1 - d, r, tag=self.tag)

class SlideRule(Canvas):

    def __init__(self, parent, xBorder, yBorder, w, h):
        Canvas.__init__(self, parent, width=w+2*xBorder, height=h+2*yBorder,
                        bg='navy')
        self.x = x = xBorder
        self.y = y = yBorder
        self.w = w
        self.h = h
        barXOff = 80 # horizontal distance from edge of bar to scale

        barH = h / 3

        self.brTop = Bar(self, x, y, w, barH, barXOff)
        self.brTop.addScale('DF', barH / 4, 1, -10)
        self.brTop.addScale('A', barH, 2, 10)

        self.brMid = MoveableBar(self, x, y+barH, w, barH, barXOff,
                                 self.brTop.scaleW)
        self.brMid.addScale('B',   0*barH/32, 2, -10)
        self.brMid.addScale('L',  15*barH/32, 1, 10)
        self.brMid.addScale('CI', 23*barH/32, 1, 10)
        self.brMid.addScale('C',  32*barH/32, 1, 10)

        self.brBot = Bar(self, x, y+2*barH, w, barH, barXOff)
        self.brBot.addScale('D', 0, 1, -10)
        self.brBot.addScale('DI', barH / 3, 1, -10)
        self.brBot.addScale('K', 2*barH / 3, 3, -10)

        capW = barXOff/3

        # draw the left cap
        self.draw_beveled_rect(x, y, capW, h, 4)
        self.draw_screw_head(x + capW/2, y + capW/2, 5)
        self.draw_screw_head(x + capW/2, y + h - capW/2, 5)

        # draw the right cap
        self.draw_beveled_rect(x+w-capW, y, capW, h, 4)
        self.draw_screw_head(x + w - capW/2, y + capW/2, 5)
        self.draw_screw_head(x + w - capW/2, y + h - capW/2, 5)

        Cursor(self, xBorder + self.brBot.xOff, w/10, self.brBot.scaleW)

    def draw_beveled_rect(cnvs, x, y, w, h, bvl, isTransp=0, tag=None):
        xIn = x + bvl
        yIn = y + bvl
        wIn = w - 2*bvl
        hIn = h - 2*bvl
        if isTransp:
            fll = { 'center': '', 'top': '', 'left': '',
                    'bottom': '', 'right': '' }
            outl = 'black'
        else:
            fll = { 'center': 'gray50', 'top': 'gray70',
                    'left': 'gray40', 'bottom': 'gray30',
                    'right': 'gray50' }
            outl = ''

        cnvs.create_rectangle(xIn, yIn, xIn+wIn, yIn+hIn,
                              fill=fll['center'], outline=outl, tag=tag)
        cnvs.create_polygon(x, y, x+w, y, xIn+wIn, yIn, xIn, yIn,
                            fill=fll['top'], outline=outl, tag=tag)
        cnvs.create_polygon(x, y, xIn, yIn, xIn, yIn+hIn, x, y+h,
                            fill=fll['left'], outline=outl, tag=tag)
        cnvs.create_polygon(xIn, yIn+hIn, xIn+wIn, yIn+hIn, x+w, y+h, x, y+h,
                            fill=fll['bottom'], outline=outl, tag=tag)
        cnvs.create_polygon(xIn+wIn, yIn, x+w, y, x+w, y+h, xIn+wIn, yIn+hIn,
                            fill=fll['right'], outline=outl, tag=tag)

    def draw_screw_head(cnvs, x, y, r, tag=None):
        cnvs.create_oval(x-r, y-r, x+r, y+r, fill='gray40', tag=tag)
        cnvs.create_line(x-r, y, x+r, y, fill='black', tag=tag)

if __name__ == '__main__':
    root = Tk()
    root.title('pyckett -- a Python slide rule')
    slideRule = SlideRule(root, xBorder=30, yBorder=30, w=1000, h=200)
    slideRule.grid()
    root.mainloop()
if runTkinter:
    !python3 applications/pyckett.py
(Not working) Aside: This also works, but adds to the Jupyter Notebook namespace, so I prefer the above.
if runTkinter:
    import applications.pyckett
and, just as a reminder:
%%sh
# using "%%sh", as inline "!" includes some non-printable characters
python3 -m pydoc applications.pyckett